Now you can buy Sonoff Dual.

-
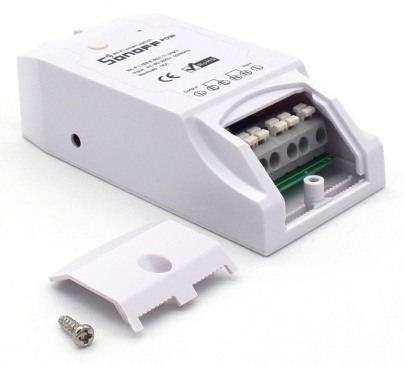
Sonoff - WiFi Wireless Smart Switch for MQTT COAP Smart Home
Pimatic = Smart Home
-
Just came here to say thanks to all contributors for this topic. After soldering in my headers (which was the hardest part!) i was able to get this relay up&running in 15 minutes! (using R108)
-
@wutu
and it has 16A relais. (The plain sonoff has only 10A.) -
@wutu said in Sonoff - WiFi Wireless Smart Switch for MQTT COAP Smart Home:
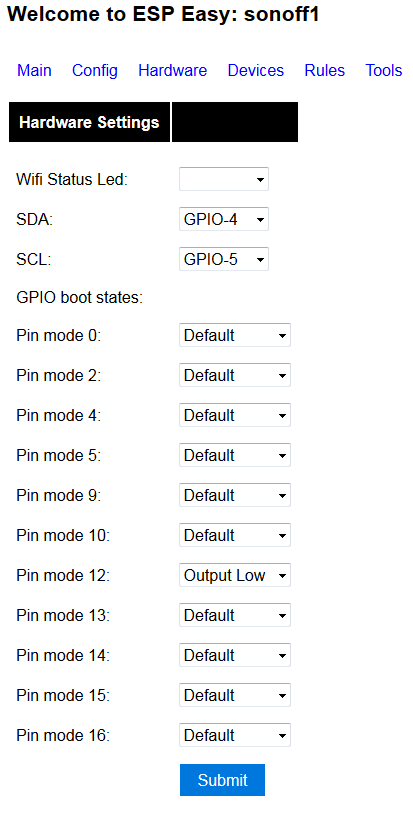
Add rules to ESPEasy:
on relay#state do
if [relay#state]=0
gpio,13,1
else
gpio,13,0
endif
endon
on button#state do
if [button#state]=0
gpio,12,0
gpio,13,1
else
gpio,12,1
gpio,13,0
endif
endon@wutu I’ve installed espEasy but have no option “Rules”. Do I need to activate that somehow? I’m using latest version R120
-
Tools -> Advanced: switch on Rules. Then you can use them.
-
thanks
Did anyone use GPIO 14 (the spare pad on J1) to connect an external switch? I want to use this to switch the light locally, independent from the controller.
As the sonoff has a transformer it should be safe isn’t it? And the switch I want to use is a normal wall switch so that in insulated for these high voltages (if there are).
So, suppose you power the Sonoff with 230V and touch this pad 5. Will you touch mains or 3v3?
-
Hello,
I got my Sonoffs yesterday and tried to use them with MQTT. Config in attachment. Where is my bug?
Daniel


-
Got some sonoff devices last week. I flashed them with Tasmota FW and all works well with the pimatic-mqtt-plugin. Also the status in pimatic is updating correctly over mqtt.
Big thanks @wutuSonoff 10A
{ "class": "MqttSwitch", "id": "mqttsonoffswitch", "name": "MqttSonoffSwitch", "topic": "cmnd/sonoff/Power", "stateTopic": "stat/sonoff/POWER", "onMessage": "ON", "offMessage": "OFF" },{ "class": "MqttSwitch", "id": "mqttsonoffPOWswitch", "name": "MqttSonoffPowSwitch", "topic": "cmnd/sonoffPOW/Power", "stateTopic": "stat/sonoffPOW/POWER", "onMessage": "ON", "offMessage": "OFF" }, { "class": "MqttSensor", "id": "mqttsonoffPOWinfo", "name": "MqttSonoffPowInfo", "attributes": [ { "name": "ENERGY.Yesterday", "topic": "tele/sonoffPOW/SENSOR", "type": "number", "unit": "kWh", "acronym": "Gestern" }, { "name": "ENERGY.Today", "topic": "tele/sonoffPOW/SENSOR", "type": "number", "unit": "kWh", "acronym": "Heute" }, { "name": "ENERGY.Current", "topic": "tele/sonoffPOW/SENSOR", "type": "number", "unit": "A", "acronym": "I" }, { "name": "ENERGY.Voltage", "topic": "tele/sonoffPOW/SENSOR", "type": "number", "unit": "V", "acronym": "U" }, { "name": "ENERGY.Power", "topic": "tele/sonoffPOW/SENSOR", "type": "number", "unit": "W", "acronym": "P" } ] },By default the device sends every 5 minutes the energy data. You can change this interval with the command
TelePeriod <seconds>in the console or by urlhttp://<ip>/cm?cmnd=TelePeriod <seconds>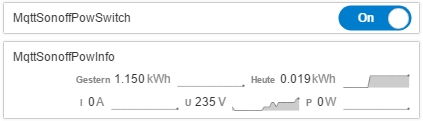
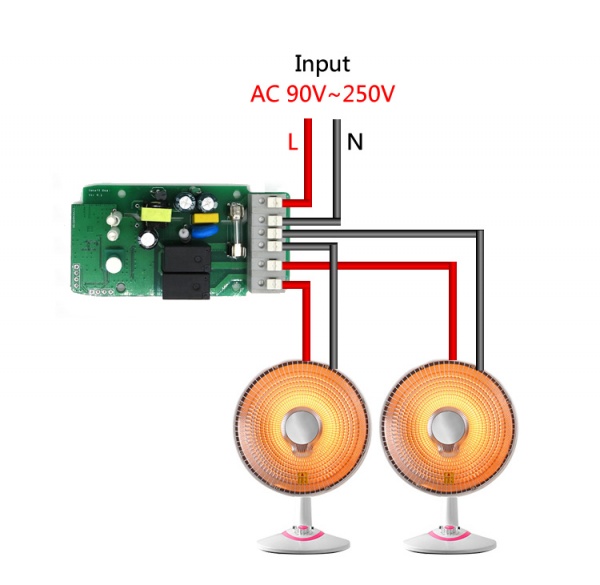
Sonoff 4CH for DIN Rail (Hutschine)
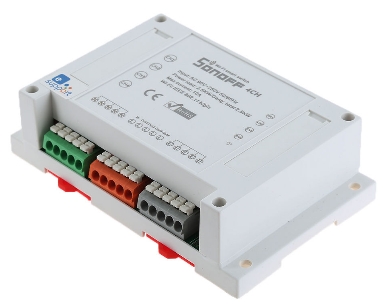
 This device has a ESP8285. When flashing with Arduino, select “Generic ESP8285 Module” as boardtype. It seems that the labeling for TX/RX on the circuit board are reversed. I had to connect TX<–>TX RX<–>RX.
{
      "class": "MqttSwitch",
      "id": "mqttsonoff4chSswitch1",
      "name": "MqttSonoff4chSwitch1",
      "topic": "cmnd/sonoff4ch/Power1",
      "stateTopic": "stat/sonoff4ch/POWER1",
      "onMessage": "ON",
      "offMessage": "OFF"
    },
    {
      "class": "MqttSwitch",
      "id": "mqttsonoff4chSswitch2",
      "name": "MqttSonoff4chSwitch2",
      "topic": "cmnd/sonoff4ch/Power2",
      "stateTopic": "stat/sonoff4ch/POWER2",
      "onMessage": "ON",
      "offMessage": "OFF"
    },
    {
      "class": "MqttSwitch",
      "id": "mqttsonoff4chSswitch3",
      "name": "MqttSonoff4chSwitch3",
      "topic": "cmnd/sonoff4ch/Power3",
      "stateTopic": "stat/sonoff4ch/POWER3",
      "onMessage": "ON",
      "offMessage": "OFF"
    },
    {
      "class": "MqttSwitch",
      "id": "mqttsonoff4chSswitch4",
      "name": "MqttSonoff4chSwitch4",
      "topic": "cmnd/sonoff4ch/Power4",
      "stateTopic": "stat/sonoff4ch/POWER4",
      "onMessage": "ON",
      "offMessage": "OFF"
    },
    {
      "name": "MQTTButtons",
      "id": "mqtt-4ch-buttons",
      "class": "MqttButtons",
      "buttons": [
        {
          "id": "mqtt-sonoff4ch-button1",
          "text": "1",
          "topic": "cmnd/sonoff4ch/POWER1",
          "message": "2",
          "stateTopic": "stat/sonoff4ch/POWER1"
        },
        {
          "id": "mqtt-sonoff4ch-button2",
          "text": "2",
          "topic": "cmnd/sonoff4ch/POWER2",
          "message": "2",
          "stateTopic": "stat/sonoff4ch/POWER2"
        },
        {
          "id": "mqtt-sonoff4ch-button3",
          "text": "3",
          "topic": "cmnd/sonoff4ch/POWER3",
          "message": "2",
          "stateTopic": "stat/sonoff4ch/POWER3"
        },
        {
          "id": "mqtt-sonoff4ch-button4",
          "text": "4",
          "topic": "cmnd/sonoff4ch/POWER4",
          "message": "2",
          "stateTopic": "stat/sonoff4ch/POWER4"
        }
      ]
    }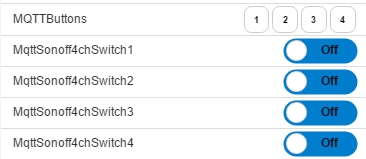
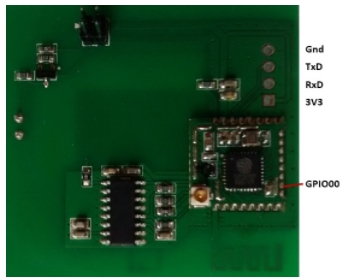
To enter the flashmode connect GPIO0 to Ground.
Sonoff DUAL
To enter flashmode connect GPIO0 to GND

-
@magic-tune thx for your investigations!
pimatic v0.9 has been released!
Support Pimatic and get some free stickers
Like us on Facebookmake it so !
-
pimatic + MySensors + Homeduino + z-way
https://github.com/n3roGit/MySensors_n3ro -
@DanielHecker does the sensor connect to the broker?
-
@magic-tune said in Sonoff - WiFi Wireless Smart Switch for MQTT COAP Smart Home:
“topic”: “tele/sonoffPOW/ENERGY”,
Where do you get the value?
“topic”: “tele/sonoffPOW/ENERGY”, -
@t1m0 said in Sonoff - WiFi Wireless Smart Switch for MQTT COAP Smart Home:
Where do you get the value?
“topic”: “tele/sonoffPOW/ENERGY”,This is the topic where the sonoffPOW (tasmota fw) publish the energy values as json string.
Exampel message:
tele/pow1/ENERGY = {"Time":"2017-02-15T11:16:20", "Yesterday":0.012, "Today":0.000, "Period":0, "Power":4, "Factor":0.35, "Voltage":230, "Current":0.050} -
 Sonoff POW and TH16 are not safe!
Yesterday a SonoffPOW begun to smell like burnt electronics. Fortunately, my wife was at home and pulled the plug in time.The housing starts to melt. The POW was connected to a washingmashine but the current flow was never more then 16A.